Wednesday, May 23, 2012

Cricut Circle Altered Box Swap

A group of Cricut Circle members got together on the Circle message board and decided to do an altered box swap.  Cricut.com had 7-inch chipboard boxes on sale for $0.99 a few weeks back, and we jumped on it.  We were to alter it according to our Swap Sister's liking and fill it with scrappy goodness.

Here is what I received from my Swap Sister, Cindy.


And here are all the goodies she stuffed inside:


In the front tied with the ribbon are blank cards she made with some beautiful papers.  Her gorgeous Cricut Circle Calling Card is in the lower left corner.  At the top of the picture is a lovely mini album she made for me.  It is beautiful!  Lots of embellies: buttons, ribbons, rub-ons, glitter, some Sizzlits dies...

And our Swap Hostess, Renee, surprised us all with these little boxes:


We each got one that was filled with all kinds of Cricut green things: twine, vinyl emblem, ink, embellies, and two very cool wooden clothespins that we're waiting to hear more about.  Seems like another swap may be in the making!

Coming up: the box I sent to my Swap Sister.

Thank you for visiting!  Please come again!

Wednesday, May 2, 2012

Milestone Birthday Banner

Today is my husband's fortieth birthday, so late last night, I was up creating this:


You know, banners are hard to take pictures of!  So here are some close up shots of the pieces.


I used the Birthday Bash Cricut cartridge for the pennants, and the Varsity Letter cartridge for the, well, letters.  The pennants were cut at 6".  I had to play with the sizes a little, in order to find a size that would be big enough without being huge, and more importantly, would allow me to cut all 15 pennants out of my 5 sheets of green cardstock.  That's one of the advantages of using the Gypsy to do your designing, being able to place the cuts in a particular spot on the mat, so you don't waste paper .  (Actually, I used my Design Studio software, and then transferred it to the Gypsy, so I could use my E2 machine, but that's just a minor detail...)  I didn't realize the pennants on Birthday Bash had a layer to them, and I really like the way it looks. 

The letters in "Happy Birthday" were cut at 3 1/2", the numbers at 2 5/8" and the "th" at 2 3/8".  The letters from Varsity Letters were so easy to layer.  I can see this cartridge becoming a favorite for signs and posters.

As always, finding the paper to use was the hardest part of the project.  I knew I wanted to use the glimmery copper paper, because of the color and its resemblance to burnt orange, the color of my husband's alma mater.  I originally tried to find a solid paper to go with it, but then thought to use a patterned paper.  That really helped to tie the copper and green together.  The yellow of the patterned paper of the letters tied in to the yellow of the patterned paper of the pennants, which then led to the green background.  All in all, the colors look great together and it is a nice, masculine range of colors.

Maybe this close up of one of the letters will help that last paragraph make a little more sense.


I hung the banner on our entertainment center, and my husband discovered it this morning as he headed to the kitchen for his morning cup of coffee.  I guess he was impressed, because he posted a picture of it on Facebook! :o)  I am also submitting this to the Cricut Circle magazine's monthly challenge.  The challenge was to create a banner.

I have been working on another project that I am anxious to share with you guys.  I finally used a new technique I've been wanting to try and I love the way it looks!  I just have to put the final touches on it and then I will share!

Thank you for visiting, and please come again!

Sunday, April 8, 2012

Happy Easter!


Matthew 28: 5-6  "And the angel answered and said unto the women, Fear not ye: for I know that ye seek Jesus, which was crucified.  He is not here: for he is risen, as he said.  Come, see the place where the Lord lay"

I hope everyone has enjoyed a great Easter Sunday.  I wanted to share some Easter baskets I made for my son's teachers at the day care center.  They had their class Easter egg hunt on Thursday, and I wanted to give the teachers a little gift.


I made these using the Cricut Tags, Bags, Boxes and More 2 cartridge.  I used the fit-to-page option for a 12x12 mat on my Expression 2, so the baskets were cut just shy of 5.5".  The baskets are quickly and easily put together.  There are two pieces to the baskets: the basket itself and the handle.  I used the scoring tool, which made folding very easy.  A little tucking here, a little taping there, insert the handle and you are done!  I then added some Easter grass, a caramel egg, and some jelly beans.  The teachers loved them!

Thank you for visiting my blog!  Please come again!

Sunday, March 25, 2012

One Crafty Birthday Celebration

Yesterday was my birthday.  I LOVE my birthday!  I'm like a kid when it comes to my birthday!  I celebrated this year by going to a painting class with some friends.  We went to a local Painting With a Twist studio.  This is one of the teach you how to make a painting places, where the teacher takes you step by step through the painting process, and you supply the food, drinks, and fun.  Here is my final product:


I keep looking at it in amazement!  I am so proud of it.  Of course, it's not perfect, and I have to stop myself from thinking "I should have painted this like that" or "I messed up right there".  But all in all, I think it's quite nice.  Now I just have to get it framed and figure out where to hang it.

I also made my birthday cake.  My husband offered to buy one for me, but I have been in a baking mood for a few weeks, and I finally got to scratch that baking itch.  Here is the cake I made, with the surprise inside:


This was my first attempt to make a checkerboard cake and I think it turned out great (although next time I'll try harder to get the squares straight)!  It was such a fun surprise for everyone!

I also made some "Thank You" goodies for everyone.  I made the milk cartons using the Cricut Tags, Bags, Boxes and More 2 cartridge.  I heat embossed the sentiment, which is a Stampin' Up! stamp.  The cartons were filled with purple and white M&M's.


To further scratch my baking itch, I also made these mini cupcakes.  I took some to my office, and my husband took some to his.  The only way I can bake around here is if I can give most of it away so we don't eat it all!  I think all this baking and decorating should hold me for a while.


I ended my birthday celebration by having a wonderful seafood dinner with my husband and son.  My birthday was fabulous, and I wouldn't change a thing!

Thanks for visiting!  Please come again!

Friday, March 9, 2012

Have a Christmas Stamp? Make a Sympathy Card!

Uh, what?  I know, I know.  Crazy title, right?  Well, that's exactly what I did -- I made a sympathy card using a Christmas stamp.  I thought the image would be perfect, and it was.


The husband of my son's first teacher at his day care center recently lost his long battle with cancer.  This particular teacher was very fond of my son and is an all-around wonderful lady.  Even though my son has been out of her class for over two years now, I felt that I needed to send her something to show our sympathy and support.

I also decided to make this card for the Cricut Circle Magazine's monthly challenge.  The February challenge was a sketch challenge: 

"We are so excited about our challenge this month! Sketches are all the rage and there are so many to choose from, especially in the Circle Magazine and on the Circle Blog. To celebrate all of our designer’s sketching ability, we want to give you the opportunity to choose a sketch and create a project with it. You can use any of the sketches from the Cricut Circle Magazine or on the Cricut Circle Blog to create a card, layout, decor item… whatever you are inspired to make." 

I used this sketch from a post on the Cricut Circle Blog way back on December 10, 2010.  It was designed by Jana Eubank.


So with my sketch in hand and my game plan in mind, I set to work, resulting in a complete and utter failure.  The colors weren't right, the sizing was off, I didn't like the images I chose -- it just didn't work.  So I scrapped it and went to bed.  The next day I played with the design using my Gypsy and rethought my color choices.  I ran to Michael's to find the right ribbon and crossed my fingers.  Success!

The background paper is a shimmery steel gray color.  I used silver embossing powder for the image.  The stamp is a Christmas stamp from Stampin' Up!  I used masking tape to block the Christmas sentiment when stamping.  The paper and the image have a very nice sheen to them.  It was hard to capture the shine in a picture, but you can get an idea of it from this image:


I was afraid the gray and the black in the ribbon would be too dark, especially for a sympathy card, but it turned out beautifully!  (I should really work on my photography skills so you can get a true sense of the colors of the card...)  The white center shape is the eyelet shape from the Elegant Edges Cricut cartridge.  I stretched its size with my Gypsy so that it is approximately 4 inches tall and 6 inches wide.  I left the inside of the card blank and wrote a note from our family to the teacher's family.

This card was nothing like I had originally envisioned.  I didn't put the planned sentiment on the front.  The colors of the paper and the image embossing are different than what I first tried.  And where did that bow come from?!  But in the end, I am very proud of this card and I believe that the teacher will appreciate it.

Thank you for visiting, and please come back again!

Tuesday, February 21, 2012

Valentine's Day Cards

I wanted to share pictures of the Valentine's Day cards I made for my son's daycare class.  It is very simple, as I figured all that the 3 and 4 year old kids would notice is the candy on the front!


I used my Cricut Anniversary Edition E2 to make these.  The bee is from the Create A Critter cartridge.  I added silver Stickles to the antennae and used chalk to give the bee his rosy cheeks.  The yellow paper has a texture to it that is not really noticeable in the picture.  The wings are made from glitter paper.  The textured paper and the glitter paper are from DCWV.

Here is the inside of the card:


The heart is from the Cake Basics cartridge and the letters are from the Pooh Font cartridge.  The heart is made with the textured paper also.  The "Bee Mine" is cut out of the heart to let the red show through.  I'm glad I figured out that would be easier than gluing the letters to the heart!  After I glued down the first heart however, I realized the inside of the "B" would be lost.  So to fix that, I lifted my "B" from my cutting mat with the inside pieces still in place.  I added glue to the back of the inner pieces and laid the entire "B" back into its cutout in the heart.  Then I removed the "B".  The inner pieces stayed in place and defined the cutout "B".  I used a rubber stamp I had in my stash for the sentiment.

I hope you had a great Valentine's Day.  I enjoyed a delivery of chocolate-dipped fruit from Edible Arrangements.  Boy were they good!

Thank you for visiting!  See you again soon!

WOW! It's Been a LONG Time!

Hello, hello!  First off, I want to thank all of my faithful followers who have stuck with me through my hiatus.  I really didn't intend to be gone for so long.  But you know how it is, once you fall off the wagon, it's so hard to get back on it!

I am going to try my BEST to post at least once a week.  That means I'd better get crafting!  I haven't really made much during my time away.  (Hmmm, now that I think about it, maybe I'll start with posting every other week!)  I do have some past creations that I've never posted, so I will share those with you.  I hope you don't mind.

So, without any further ado, welcome back to Riley's Custom Creations!

Monday, June 6, 2011

Butterfly Card


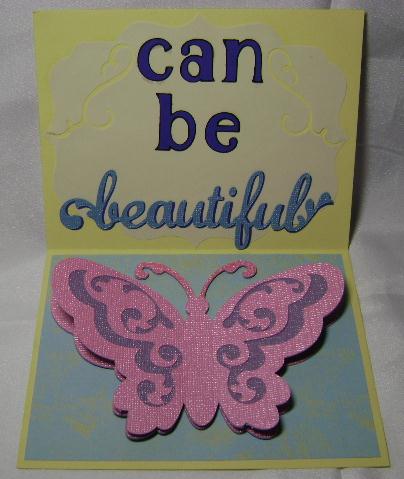
I made this card just because.  The idea popped in my head one night and I had to make it.  I don't have any one to give it to at this time, or even an event that is coming up that might lend itself to using this card.  But when inspiration strikes, I must follow through with it.  Especially since I haven't created much lately.

This card uses 6 different Cricut cartridges: Alphalicious, Elegant Cakes, Elegant Edges, Quarter Note, Walk in My Garden, and Wall Decor and More.  I used chalk to accent the caterpillar.  I cut two of the butterflies and glued them together at the body.  There are dimensionals between the wings to give them a little lift.  The "beautiful" cut does not have a shadow layer, so I cut another one out of dark blue paper and offset the two.  I think this makes it a bit easier to read.  I am really pleased with the final result.

I designed this card on Design Studio.  As I finished it up and was saving it so I could transfer it to my Gypsy and then cut it with my E2, my Design Studio crashed and I lost it all!  Luckily I had been jotting down notes as I compared images to decide which ones I wanted to use, so I was able to recreate it pretty quickly, except for the lettering, since I had stretched those to the size I liked.  So what did I learn from this experience?  Just like with any computer program, SAVE, SAVE, SAVE!!

Thank you for visiting and have a great day!

Monday, May 30, 2011

Happy Memorial Day

I hope everyone is enjoying a safe and fun Memorial Day.  Please remember to pause at 3:00 pm your local time and have a moment of remembrance in honor of all those who have fallen while defending this country.  Let's not forget that Memorial Day is more than a day of barbeques, pool fun, retail sales, and the unofficial start to the summer.  We would not be able to enjoy all of those things had it not been for the sacrifice of our military forces.  Thank you to all the families who have lost a loved one in the name of freedom.

Thank you for visiting and please come again!

Friday, May 27, 2011

Mini Album for SST Swap


Back around Valentine's Day, the crafty Sistas who hang out on the Sistas Scrap Too! thread on the Cricut messageboard did a mini album swap.  We had to make the album, and also decorate a container to hold the album.  This was my first attempt at a mini album, and boy, did I pick a labor-intensive one!  This definitely was not a beginner-level project.

The album's design came from Kathy at Paper Phenomenon.  She did a 9-part mini-series on how to create this style mini.  (I guess the 9 parts should have been my first clue as to the difficulty level.  But in my defense, I joined Kathy as she was making the videos, so all 9 weren't there when I decided to make the album!  And I didn't include all of the features that she did, so I thought I had simplified it quite a bit.)  Kathy has some amazing tutorials of different types of minis.  This is the first one I've made followed her directions, but definitely not the last!


I am really proud of the finished product.  So much so, I really hated to send it to my swap partner!  I wanted to keep one for myself, but I knew I wasn't going to do another one any time soon.  As luck would have it, the person who made an album for me made the same type of album!  She also followed Kathy's videos.  So in the end I got my mini album that I wanted!  The altered box is a wooden box that I painted and decorated.  The mini album JUST fit inside of it.

I made a video showing all of the pages of the album. Please note, this was my first attempt at making a video so please excuse the moments when there is more camera movement than there should be.  I figured a video would be easier to share than a ton of pictures for this project, but I wasn't even sure I could make a video long enough with my small digital camera.  I also hurriedly did it so I could get the album in the mail to my swap partner.

Enjoy, and thanks for visiting!

Monday, May 23, 2011

Mini Albums as Scripture Books


I made these Scripture Books while I was at the Cricut Stampede back in March.  I had a blast while there, and am somewhat surprised that I actually finished a project!  These books are for the ladies in my Jr. Mission group at my church.  I wanted to give them something they could easily slip into their purse and carry their special, personal Scripture verses with them.  I used papers from the Faith paper stack by The Paper Studio that I found at Hobby Lobby.

The book itself is a Meander mini album, made with a 6x12 sheet of black paper.  The album has 5 pockets.  I ran across the idea for this album on The Paper Trail.  Laura gives great instructions on the assembly of this album.

Take your paper, and on the 6" side, score lengthwise at 3".  Turn the paper onto the 12" side.  Score every 2 inches.  You will end up with a grid of 12 squares.  In the photo below, I've drawn lines showing where to cut the paper. 

With your paper oriented horizontally, you will cut from the edge of the paper to the horizontal score line, alternating top and bottom halves.  Hopefully the photo makes sense of that previous sentence. 

I am a visual learner, so in the next picture I've labeled each rectangle on the paper to help with the folding instructions.

Take A and fold it down behind G.  Fold G over on top of H.  H then folds up behind B.  Fold B over on top of C.  C then folds down behind I.  Fold I over on top of J.  Fold J up behind D.  D folds over on top of E.  E folds down behind K.  K folds over on top of L.  Lastly, L folds up behind F.  You should now have a little stack with A on one end and F on the other.  The A and F flaps will be attached to the front and back covers.

To seal the pockets, I cut small strips of paper and wrapped them around the open sides.  I then used a circle punch to cut the notches for each pocket.

To make the cover, I used two 2 1/4" x 3 1/4" pieces of chipboard.  I cut the paper used for the cover to 2 1/2" x 7".  I placed the chipboard pieces as shown below, leaving a 1/8" border on the sides, and a 1/4" space in the center.  This gap will be the binding for the book. 

After attaching the 2 1/2" x 7" paper to the chipboard pieces, I attached the A and F panels of the album to the front and back covers.  I then used two 2 1/8" x 3 1/8" pieces of paper to cover those panels and give the book a finished look.


I printed each Scripture on white paper and cut each verse to measure 1 7/8" x 2 7/8".  The papers easily slid into each pocket. 

I am very pleased with the way these books turned out.  I wanted them to be small enough to be easily carried, yet sturdy enough to withstand being in a purse or bag.  I didn't want to over-embellish them, again to keep the size to a minimum, but also because the important part of this project is on the papers inside the pockets.  I felt that using the Faith papers with the printed words was all the embellishment that was needed.

Thank you for visiting, and please stop by again!

Sunday, May 8, 2011

Happy Mother's Day!

I just wanted to take a moment to wish all the mothers out there a Happy Mother's Day!  To all the mothers, stepmothers, grandmothers, aunts, sisters, cousins, friends, and neighbors who have played a role in raising a child, this day is to honor you!  Thank you for all you have done and continue to do!

Saturday, May 7, 2011

Happy National Scrapbooking Day!!!

So, after a long hiatus, I have returned.  And I thought nothing would be more appropriate than to revive this blog on National Scrapbooking Day.  There are so many blogs, websites, stores, etc., that are having special events, contests, giveaways and more.  I hope you are able to find some time, if not today, then tomorrow, to do a little something crafty.

My plans for today are still up in the air, but I am scheduled for a mani/pedi early this afternoon.  I want to go shopping to find a dress to wear to church for Mother's Day tomorrow.  (I probably should get up and take care of that before the mani/pedi.)  Then I want to take the family to the Pecan Street Festival in downtown Austin.  It's a fun street fair, craft show, carnival, music show, etc. all rolled into one.  I'm thinking of taking the train this time to avoid the hassle of parking downtown.  Plus, my two-year-old would enjoy riding the train!

But the one thing I WILL do at some point today, is play with this:


My new E2!!!!!  Yes, after saying over and over that I didn't need one, but I that really did want one, I caved and bought one online about 5 minutes before the TV launch on HSN.  She arrived last Friday.  I've only had time to turn her on and do a couple of simple test cuts, so I plan to really get to know her this weekend!

Enjoy National Scrapbooking Day and have a great weekend!

Monday, March 21, 2011

I Stampeded, I Laughed, I Created

Hi everyone!  I know, I know.  It's been a long time since I've posted anything.  Life got a bit busy there for a while.  I spent this past weekend in Frisco, TX, at the Cricut Stampede.  I had so much fun!  I laughed and talked so much I was hoarse.  I did get a few things done too. 

I have taken this week off from work, so I will get some posts done this week.  I have some blog awards I have been remiss in acknowledging, along with a few creations I wanted to share.  So stay tuned!

Monday, February 14, 2011

Blog Candy Winner!!

Thank you to everyone who visited Riley's Custom Creations during the Sistas Scrap Too! Valentine's blog hop.  I loved reading all of your comments, and I want to say "Hello!" to my new followers.

As promised, I have selected a winner of the blog candy.  I had 30 comments that were eligible for the drawing, and Random.org has selected.....


Comment number 10 is: 
Renee said...

soo pretty. I Love it.. good job

Congratulations Renee!  I left you a comment on your blog about your win.  Hope to hear from you soon!  Thank you so much for visiting my blog!


I hope everyone has had a terrific Valentine's Day.  I want to share a couple of pictures of the bouquet that my husband had delivered to my office.  Isn't it beautiful?!  The pictures really don't do it justice, and the scent is divine!


Thank you for visiting and please stop by again!

Saturday, February 12, 2011

2011 SST! Valentine's Day Blog Hop


Welcome to the Sistas Scrap Too! second blog hop! We had so much fun with our first hop that we decided to do a hop once a quarter. This is the hop for the first quarter of 2011 and we are glad you decided to join us! We have 14 designers working on our theme for this hop, which is none other than Valentine's Day. We've put a twist on it, asking the designers to use the colors red, black, and white in their designs. We can't wait to show you what we've come up with! Some of the Sistas went the traditional route and used traditional colors for their projects. What would craftin' be without creativity and diversity?! We know you'll enjoy what lies ahead on the hop route!!

Remember, start at the beginning of the hop (here) and work your way through each blog. Please leave blog love (comments) along the way and become a follower of the blogs so that you can see the beautiful creations year round and not just when we have a hop! There are Sistas who are offering blog candy and you never know where you'll find some so be sure to visit each participating blog. Thank you for joining us for our 2011 SST! Valentine's Day Blog Hop! We hope you enjoy the creativity...

My first project is a card I made for the monthly swap with my local scrapping group.  I used Cricut Design Studio to get the card front just the way I wanted it.  The French Manor cartridge has a card cut that has the front cut shown, but it is not centered on the card.  I wanted it centered, so with a little contour hiding and adding a plain rectangle, I got the card front that I wanted.  It measures 5 1/4" by 4".  The base of the card is a standard A2 size.  The strawberry is from Celebrate with a Flourish and cut at 3 3/8".  The red layer cuts with the strawberry cap on it, so I just cut that off.  I used Aleene's Paper Glaze to give the chocolate its sheen.  The strawberry is tucked under the card front.  I added 3 heart buttons in the upper left to balance the space usage.  Inside it reads "Happy Valentine's Day" with a stamp I got from Hobby Lobby.


Up next, a layout.  As with most layouts with my son's pictures, it is pretty simple.  With the black cardstock, I cut the heart from the Home Decor cartridge at 11 1/4".  I used the negative of the cut and placed it on the roses paper, which is The Paper Studio brand from Hobby Lobby.  The "Love" came from the Martha Stewart Elegant Cake Art cartridge and the other letters are from the Plantin Schoolbook cart.  The letters were cut at 1 1/2", but I did stretch the "Love" a bit to fill the area.


I had to play with this one a little to figure out the best way to place the cardstock on the patterned paper. I first used my ATG, but that adhered before I had my paper straight. I ended up using Modge Podge on the cardstock and placing the patterned paper on it. This caused the layout to curl and wrinkle some, so I may redo it. I know I won't be happy with the buckled paper.


Now, if you've made it through the hop thus far, and made it all the way to this point in my posting, then you deserve a chance at some Blog Candy!  I am giving away the Organic Flourish Cuttlebug embossing borders set.  If you've read my previous blog post, you know that I wanted this set so much, that I ended up buying 3 of them!  So I am sharing one set with one of you.  I am also giving away a 6x6 stack of  Making Memories Embellishment Paper.  This pack of the Cosmopolitan Collection has the nicest prints in combinations of blue, brown, and yellow.  And something tells me that the winner of this blog candy will find some surprises along with these two items.


In order to be eligible, please leave a comment here, and a way for me to contact you (through your blog is fine) by midnight Eastern time, Sunday, February 13th.  While I would love for you to become one of my followers, I'm not making it a requirement for the blog candy.  I will choose and post the winner using Random.org on Valentine's Day.


Hop Line Up

I hope you enjoyed my projects! Here is the list of participating blogs. I've made them clickable to make it easier for you to follow along the hop route. Don't forget to stop by and visit everyone. Leave some blog love and enjoy!  Thanks for visiting, and hope to see you next quarter!  Now, head on over to see what Kim has created for us.

Sumaiyah:     http://www.stampindymonz.com/ 
Cassie:          http://cjscropcorner.blogspot.com/
Michele:         http://nowstampthis.blogspot.com/
Yvatte:           http://gr8ful1-sweetlilscrapper.blogspot.com/
Lei:                http://divinescrapper.blogspot.com/
Renee:          http://reneehagler.typepad.com/
Tonya:           http://rileyscustomcreations.blogspot.com/     <-- You are here!
Kim:              http://kim-kimscreativecorner.blogspot.com/
Cammi:         http://cuttin-up.blogspot.com/
Normea:        http://mmdezigns.blogspot.com/
Ella:               http://sharingmystuff.blogspot.com/
Lanita:           http://stepintonitasworld.blogspot.com/
Vernetta:       http://scrapinnovations.blogspot.com/
Netta:            http://craftcreationsbynetta.blogspot.com/

Friday, February 11, 2011

Blog Hop Tomorrow!

Just a quick reminder for you to join us tomorrow for the quarterly Sistas Scrap Too! Blog Hop.  We will be showcasing Valentine's Day projects.  So come back tomorrow starting at 6:00 am Eastern and get the inspiration you need for those last minute projects!

Wednesday, February 9, 2011

Another Blog Hop, Coming Soon!

On Saturday, February 12th, starting at 6:00 am Eastern, the ladies of the Sistas Scrap Too! thread on the Cricut message board will have a Valentine's themed blog hop.  These ladies are truly talented, and I know there will be some great projects shown for you to enjoy and scraplift!  If you joined us for our Christmas hop, then you know that you are in for some wonderful creations!

And you know what a blog hop means....Blog Candy! Here at Riley's Custom Creations, I will be giving away a 6x6 paper pack and a Cuttlebug embossing set that I liked so much I bought it not once, not twice, but three times!  Who knows, something else may fall into the blog candy box by the time Saturday arrives...

So be sure to visit on Saturday, February 12th, for the Sistas Scrap Too! Valentine's blog hop!

Wednesday, February 2, 2011

Explosion Box with a Twist Part II


So finally, here are the details of the explosion box with a twist, as found here.

Recipe:
Green Cardstock: DCWV Prints for the Year Ultimate Stack
Light Blue Cardstock: DCWV The Christmas and Winter Combo Cardstock Stack
Dark Blue Cardstock: Best Occasions
Green Patterned Paper: DCWV Prints for the Year Ultimate Stack
Blue Patterned Paper: DCWV Holiday Collection The Christmas Stack
Cricut Tags, Bags, Boxes, and More cartridge
Cricut Elegant Cakes cartridge
Roses embellishment: part of my stash, not sure of manufacturer
Ribbon: from Joann's
Best Blossoms and Flower Lines Stampin' UP! stamp sets
Stampin' UP! Brilliant Blue ink
Glue Dots
Zig 2-way glue pen
ATG

For the box base, I scored one 12x12 sheet of paper at 4" and 8".  Then I turned it 90 degrees and scored again.  You will have a 3x3 grid of 4" squares.  I then scored the corner squares diagonally, to help with the folding.

I then cut (4) 3" squares of the green patterned paper and cut them in half to make the triangles. I taped them to the corners of the base paper, eyeballing the distance between the two triangles and between the triangle and the edge of the base paper.

The tags and tag holders were designed with the Cricut Design Studio software.  I used the Tags, Bags, Boxes, and More cartridge.  For the tags, I cut the blue cardstock using the scallop tag cut and the blackout feature, since I didn't want a hole in the tag.  I started with the tag set at 3 1/2" This resulted in a skinny tag.  I then stretched it so that its width was 3".

For the tag holders, I used the tag pocket 1 cut, again using the blackout feature. I started with the pocket set at 6 3/4" inches.  I needed to stretch it to accomodate the wide tag.  I also wanted to elongate it in order to have an overlap with the bottom of the box.  There is 3/8" of the tag holder that is attached to the bottom of the box, and then covered by the blue square.  This way, the tag holders are secured to the bottom, allowing for the sides of the box to be used for pictures or journaling, but the attachment is covered to give it a clean look.


The tag holders ended up measuring 4 1/4" by 7 1/2".  Since I did not use 2-sided paper I ended up with the inside of the holders being white.  So I cut tags that were the same dimension as the tag holders and then used scissors to cut just the top scalloped part off.  I then taped the scallop on the inside of the tag holder.  While the pattern did not line up exactly, it came very close, and is really not noticeable once the blue tags were inserted.  I then scored the bottom at 3/8" and attached them to the bottom. 

I cut a 4"x4" blue square and attached it to the bottom of the box.  My mistake was that I didn't stamp it before I attached it.  I knew I wanted to stamp something on it, but hadn't decided what.  My crafting got ahead of my brain and I went ahead and assembled the box without the stamp.  Luckily, the box folds out pretty flat, so doing the stamping wasn't too much of a problem, but I would definitely stamp before assembling it next time!  I used 3 different stamps to create the rose.  The leaves were from the Best Blossoms set.  I didn't ink the very top leaf of this stamp.  I then used the stem stamp from the same set to extend the stem a bit.  And finally the rose came from the Flower Lines set.

For the decoration on the outside of the box, I used the Cricut Elegant Cake cartridge.  I cut (4) of the accent5 images at 3".  I used the light blue cardstock for the base cuts and the dark blue for the shift key layers.  I assembled them with my Zig 2-way glue pen and attached them to the box sides.

The box base is now complete.  Just tuck in the corners and you're set!

To create the top of the box, I started with an 8"x8" sheet of cardstock.  I scored it on all sides at 3/4" and at 1 3/4".  I trimmed the corners off (a small 3/4" x 3/4" square) so they wouldn't become too bulky.  I folded at the 3/4" score lines and then folded again at the 1 3/4" score lines.  This double folding gives the box top a finished edge.  I taped down the edges of the box top.  I didn't tape down the first fold at the 3/4" score lines, but doing so will give the top a little more of a secure hold.  I folded the corners in (the same as for the box) and taped them down.  I used paper clips to secure them until my adhesive set. 

I used my ATG to put adhesive on the back of the ribbon and attached it to the top.  Attaching the roses to the top was a little bit harder, as they didn't have a solid backing to them, just a bunch of floral wires wrapped together.  I thought a hot glue gun might be needed here, but I made do with some glue dots I had.  I just put them anywhere I could attach them and kind of stuffed them into the nooks and crannies of the wires.  They were then placed on the box top.  Again, this was something I should have done before I folded the box top, but I wasn't originally planning to use the roses or the ribbon.  I had intended to put a bow on the top, but I couldn't get my ribbon to cooperate with making a bow, so I substituted the roses and used a different ribbon to coordinate.  I like the way they look, but they don't exactly match the blue of the side decorations.

Place the top on the box base and there you have it, my version of the explosion box, with a twist!


Thanks for visiting!

Sunday, January 30, 2011

Explosion Box with a Twist

Well I did it!  I finally made an explosion box.  I've been wanting to attempt one of these since I first discovered them mid last year.  I made this one with a push from Stampin' Dymonz on her blog, http://www.stampindymonz.com/.  She is doing 52 weeks of creations, and this was the project for week 3

Here's my take on it.  I can't take credit for the "twist".  After a day of blog hopping and web surfing, I found myself at http://www.thescrapyardrose.com/.  Her post on her Thanksgiving mini album is what gave me the inspiration to do the explosion box a little differently.


Side View

Top View


The "Exploded" View


This view shows how the tags are not attached to the sides of the box.  This gives extra room for journaling, pictures, or whatever, on the sides.
 
I will edit this post tomorrow (hopefully!) with the details on making this box.

Thanks for visiting!